If you have gotten to this stage, it’s obvious that you have been through the first three steps of your NBI Clearance Application. Payment comes as the fourth step. We have received many complaints from people who face challenges and mishaps during the procedure. We, therefore, decided to provide a detailed step-by-step guide on how to go about it.
7-Eleven is just one of the few options through which anyone can pay for the NBI clearance. Local banks and Bayad Centers are some of the other alternatives. 7-Eleven is, however, a favorite to many. The reasons for this are that it is convenient, easily accessible, and has more branches compared to Bayad Centers.
Local banks receive a huge thumbs-down from us. The queues and congestion present in them will not only leave you frustrated but also unattended at times.
>> Read How can I register NBI clearance online?
Table of Contents
How to Pay Your NBI Clearance Application in 7-Eleven : Step by Step
With that said, it is no secret that many Filipinos turn to 7-eleven as their first priority when paying for their NBI Clearances. Here is a step by step guide to help you pay for clearance through a 7-eleven branch.
The process can be divided into seven major steps, as outlined below:
- Finding an operational 7-Eleven branch with a working Cliqq Kiosk
- Getting Assistance
- Going to Bills Payment
- Keying-In Payment Information
- Verifying the Details
- Printing the Slip
- Paying for the Slip
Step 1: Find a 7-Eleven Branch That Has a Cliqq Kiosk
7-Eleven has many branches, no doubt about that. And this is one of the aspects that makes it an NBI payment option of choice for many. Most of the branches have a Cliqq Kiosk, although not all will be convenient for you. The first step is finding a branch that is nearest and most convenient for you.
Step 2: Get Assistance
In some cases, the 7-Eleven branches normally have Cliqq kiosks which are un-operational. The systems are touchscreen, and you do not necessarily need help getting through. But technical hitches occur without forewarning. The kiosk might also be offline, so you need to confirm from the cashier. This is a precautionary measure to avoid wasting time or other inconveniences thereafter.
Step 3: Go to Bills Payment
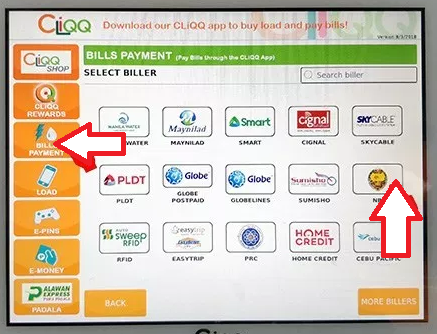
You are now in front of the Cliqq kiosk. On its initial screen, there is the BILLS PAYMENT section. Tap on it to proceed. The screen will then display several options. You need to locate your point of interest. Your payment relates to NBI, so tap on the NBI logo. This should be on the far middle-end to your right. There are the NBI initials below the logo, so there is no need to freak out if you feel you are not quite familiar with it.

Step 4: Key-In Payment Information
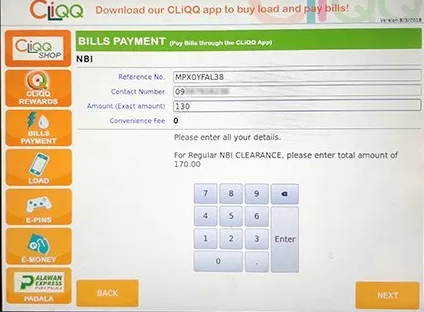
After clicking on the NBI logo, you will be directed to the next step feeding in your payment information. The information required is the details given to you while applying for the NBI Clearance. It includes:
- Your NBI Clearance Reference Number
- The Contact Number
- Your Payment Amount

Be careful while feeding the details, and especially the reference number. Note that in case of an error of the reference number, the cashier cannot refund the money once the payment is complete.
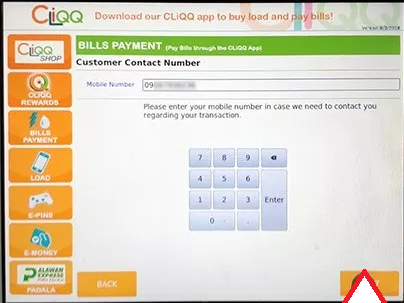
Ensure the reference number is correct then click ‘NEXT’. This will then prompt you to feed in the contact number once again. Key-in and click on NEXT.

Step 5: Verify the Details
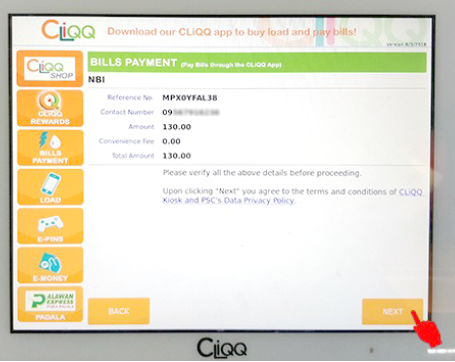
Once you tap on NEXT, the information you entered will appear on the Cliqq Kiosk screen, as shown below. It is not too late yet to counter check your reference number, and you can amend the details by simply tapping on BACK. Review the details and make sure all the required information is correct.

If confident that the details are right, tap on NEXT.
Step 6: Print the Slip
Clicking NEXT after verifying the details will automatically print your NBI clearance payment slip. Just check below the Cliqq Kiosk screen and collect the receipt.
Step 7: Pay for the Slip
Once you collect the receipt, do not forget to go to the cashier and pay the cash. It is the last thing you will do at the 7-Eleven Cliqq Kiosk, although you should keep the slip safe and remember to present it to NBI to complete the clearance process.
Conclusion
Our article details everything you need to know about how to pay NBI clearance via 7-Eleven. You’ll agree with us that the process is quite simple and you should hardly incur any problems. However, if this is the case, don’t hesitate to drop a comment. We’ll be more than glad to respond to your issue.
